Showing posts with label crafts. Show all posts

Tuesday, February 28, 2012

Etched mugs and pop can coasters {handmade Christmas gift}

I'm still posting Christmas gifts :-). All the guys got big glass mugs with sports logos etched on them. I made these before I got my Silhouette and my friend, Li, was kind enough to help me out with hers. Each guy got two mugs with various logos: BYU, UW, Seahawks, and Gonzaga. The mugs are nice and big. You can put them in the freezer and they fit a whole can of pop plus ice.

It's kind of hard to take a picture of etched glass. These are Eric's--Seahawks and UW.

The guys also got pop can coasters. We don't buy cans of pop, so I had to beg and steal them from my parents and Eric's parents. I tried to give each guy coasters with his favorite flavors. I also made some Dr. Pepper ones for my sister since she's obsessed with it.

Not all of the coasters turned out. The picture I have is actually from a reject one, but you get the idea.


Ahhhh... Pepsi. Love it.

Tutorial for the coasters can be found here.

Inspiration for the mugs from Pottery Barn. I bought the mugs from Amazon.
Posted by Picasa

Tuesday, January 24, 2012

File folder games quiet book {handmade Christmas gift}

I made each girl a binder with file folder games in it. The following pictures are from Lauren's book:


I've been wanting to make file folder games for awhile. I picked up a book of games at a swap table at church. Then the crafting stars aligned:
1. We bought a scanner so we could make a slide show for Eric's dad's 60th birthday. I could then scan and print the pages from the book instead of taking them somewhere to be copied.
2. I saw this post on Pinterest. I realized I could cut the folders down to fit into my laminating sheets and then into a binder. I also decided to use magnets so it would be quieter at church (this is a quiet book after all).
3. I saw this post on Pinterest. I saw the zipper bag and knew how I could store the pieces to the game. That part had been holding me up. I decided to put the pieces from each game in a ziplock and all of the ziplocks in the pouch.

I spent many hours coloring, cutting, laminating, cutting again, and attaching magnets. But honestly, it was way better than when I made a fabric quiet book. I just worked on it every night while watching TV.

The girls have brought them to church every Sunday since Christmas and they love them. Kaylin saw me working on Lauren's and really wanted one too. She was excited when she found out that she had her own, although she prefers Lauren's baby games to her own. Oh well, as long as she likes it and it keeps her occupied, I'm happy.

It will be easy to add new games and trade out old ones. I love them, the girls love them, we're all happy!
Posted by Picasa

Saturday, October 01, 2011

Lost Socks

I don't know about you, but we have a lost sock problem. It reminds me of this Seinfeld clip. Eric and the girls always seem to be losing a sock. Kaylin is the worst, she usually wears multiple pairs of socks a day and takes them off all over the place. The other sock usually shows up by the next time I do laundry, but I haven't had a good place to keep the matchless sock until then.

My solution:


It's hanging in my laundry room and I love it! I now have a place for lost socks. What can I say, it's the little things that make me happy.
Link
Crafty Details:
I already had a 7"x24" board cut from a previous project. I spray painted it with Krylon Ocean Breeze, which was leftover from my craft room update that I don't think I've posted. I cut vinyl using my friend's Cricut (thanks, Brittany!) and applied it to the board. I mod podged paper onto wooden clothes pins and then hot glued them to the board. I attached my favorite self-leveling picture hanger to the back. I'm not sure where I originally saw the idea, but after a quick google search I think it was from here.
Posted by Picasa

Tuesday, September 20, 2011

Fall Garland

While at Target today I found some glittery pumpkins and leaves in the dollar section. They were $1 for a pack of 5. I wanted to buy them, but I needed a use for them. I decided that I could make a fun fall garland for our fireplace.

Link

I like how the pumpkins match my glittered pumpkins and the leaves match my red vases and chair.


Kaylin loves it. When she saw it hung up she said, "Look, Mom, a pattern! Leaf, pumpkin, leaf pumpkin..." She also thinks that I need one more pumpkin on the end to finish the pattern. I then explained the symmetry of the garland to her. I was happy to have an opportunity to talk math :-).

In case you're curious, here's how I made the garland:

I punched two small holes at the top of each pumpkin/leaf, I think I used a 1/8" punch. I wove hemp twine in the left hole, around the back, and then through the right hole so that the twine will be behind the pumpkin/leaf. {Side note... I have hemp twine leftover from when I used to make hemp necklaces in high school. They were so cool. Did anyone else make those or was that just cool at my school? It's come in handy for many craft projects, it's thin and sturdy and I love it.} That's it. It took me around 5 minutes and cost $2.
Posted by Picasa

Monday, August 29, 2011

Magnetic Travel Toys

We're going on a long car ride soon (about 8 hours each way) and I needed a few more activities to keep the girls occupied.

I decided to make some magnetic toys! They weren't too much work, fun to make, and fairly inexpensive since I already had a lot of the supplies on hand. Also, it helps to have a laminator.

I bought them each a small cookie sheet from the dollar store, they're about 9"x13". They're a great tray for coloring, snacks, or magnets.

I made each girl a set of tangrams.


I printed this pattern (small version) and then traced it onto craft foam from the dollar store. I bought a roll of sticky back magnets from JoAnn's and cut a small piece for the back of each shape. I printed the animal tangram patterns. I left the cards as the "answers" because Kaylin is only 4. I cut the patterns into sets of two and laminated them back to back.

I made Lauren a set of the shapes too. I made them with pink foam so I can easily keep the two sets separate. I am not expecting my one and a half year old to make pictures; I figure she'll have fun just playing with the shapes.

Next I made some magnetic play sets.

Princess and the Frog

Toy Story 3

Farm set

Picnic set

The two Disney sets are paper doll printables. I just cut out the parts I wanted, laminated them, cut them out, and attached a magnet to the back of each one. I love that they have a background to play on.

The farm and picnic sets are cutting activities for kids. I didn't print all of the pages for these ones. I thought the barn needed a little more for the background, so I cut out some green paper for grass and glued the barn and grass onto a blue piece of paper.

I needed a place to store all of the pieces! The next day one of my favorite blogs, Make it and Love it, posted about vinyl pouches. Problem solved!

I had some thin clear vinyl and velcro on hand so I got to sewing. The tip in the post about putting scotch tape on your presser foot and the bottom plate by the feed dogs worked like a charm. I'd almost sworn off sewing on vinyl until I tried this. Then I attached sticky back velcro circles to the back of each pouch and the back of each background paper. Awesome. Now each play set is organized and all the pieces will stay together!

Kaylin has been wanting to play with the magnet sets, but I won't let her. I keep telling her that they're only for our car trip. Now that they're finished they're hidden away and I think she finally forgot about them. Hopefully these will make the trip a little easier on the kids (and the parents!).

In case you're curious, other things we're bringing include:
Tag Reader with headphones, extra batteries, and a new book
Cinderella book with dry erase markers (from Costco)
Tangled book with cling stickers (from Costco)
Dry erase cards with letter tracing
Magnetic letters to use with the cookie sheets
Coloring books and crayons
Lacing cards
Pipe cleaners
Misc. books
Portable CD player and iPod with headphones
Travel pillow
Lots of snacks!

Thursday, May 05, 2011

Knitting update

I have now knitted SIX washcloths! Five are pictured in this post.

Here are my first three, from the Learn to Knit mini-series on Make It and Love It.


After I finished my first knit washcloth, I couldn't wait until the next post in the series, so I made another:

Ahhhhh... Much better than the first. The yarn is fun too.

Then I was on my own. My mom lent me a book of washcloth patterns. I went through it and found the ones using the skills I already knew so that I could practice them before moving on to other fancy things like yarn overs and twists.

Here is the one I made for a friend:


Fancy!

I just finished another washcloth from a different diamond pattern for myself using the brown and blue yarn.

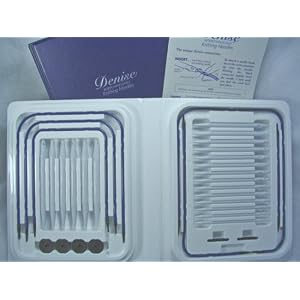
I needed to buy my own needles since I wanted to return the ones I borrowed from my mom. So I bought the same set my mom has, the Denise Interchangeable Knitting Needles.
These are not what she let me borrow. I borrowed the first sets of circular needles she bought before buying the interchangeable set.

I LOVE these needles! They are so easy to use. I highly recommend them if you're going to start knitting. You can buy them for about the cost of 4 sets of circular needles. If you're going to need multiple sizes then it's definitely worth it. It comes with 10 sizes! Plus you can choose the length of your cord and you can combine multiple cords together. When you're not working on a project you just pop the needles off and put on an end button. They are fabulous. There's my unasked for, unpaid review :-).

I've been having a lot of fun knitting. It's been a great thing to do while watching TV at night and I love using my new washcloths. Maybe someday I'll try something other than a washcloth.
Posted by Picasa

Thursday, January 06, 2011

Christmas Gift Tag Party

I hosted my 3rd (almost) annual Christmas gift tag exchange party. I say *almost* because I missed last year. Something about me having a baby last December.

Here is the tag I made this year:


I love that the bells jingle!

Four other ladies were able to come exchange tags, plus one more who came to hang out with us. It was lots of fun. Everyone brought a snack and we had yummy cider and just talked. It was great to have a relaxing and fun night!


Aren't they cute?

We each went home with three of each tag.

Some action shots:


Thanks ladies! The tags were awesome! I can't wait until next year!
Posted by Picasa

Tuesday, November 30, 2010

Earring Organizer

I {used to} keep all of my earrings in a small drawer in my jewelry box. Recently, I made myself another pair of earrings and it was getting out of control in there. I finally dumped my earrings onto my dresser so I could see them all and find what I wanted. The time had come for a new earring organizer. Laura made a great one awhile back and I saved her blog post so I could copy her.

Here is my new earring organizer:


It cost me $1 out of pocket! I bought a frame at the dollar store, spray painted it white with paint I already had, convinced Laura to let me have an 8"x10" piece of the mesh she bought for her earring organizer, and used a piece of scrapbook paper I already had. I simply adhered the paper to the frame back and hot-glued the mesh onto the frame. I also found that I needed paper with a lot of contrast to look okay through the mesh, thus the black and white print.

It's now hanging in my closet, which I LOVE. Eric just put up more shelving and hung our mirror on the wall in our closet. I hung my earring organizer next to the mirror and it's so easy to pick out earrings when I get dressed! The stud and hoop earrings are still in the jewelry box. They don't work on the organizer, it's just for dangley earrings. Apparently "dangley" isn't a word, spell check doesn't like it, even if I spell it "dangly". Oh well, that's what they are.

Note about the earrings:
There are 10 pairs.
I made 7 of them.
Laura made one of them.
A fabulous lady from church taught Laura and me how to make earrings. She made one of the pairs.
Only one is store bought.
I'm not sure if this is good or bad.
Posted by Picasa

Tuesday, November 16, 2010

Christmas Wreath II

Thanks for all of your input on whether or not to add a bow to my wreath. I decided to add a bow and I LOVE IT. What do you think?


Better yet, I found this wired ribbon at the dollar store. So the total cost of the wreath was only $6! I love it so much that I want to hang it up right now. I will wait until after Thanksgiving, which is just over a week away. My wreath will be okay in the hall closet until then.
Posted by Picasa

Wednesday, November 10, 2010

Christmas Wreath

Last night I made this Christmas wreath:


I simply took a wreath and hot-glued ornaments all over it. I'm pleased with how it turned out and it was quick and cheap to make. Plus, Eric even said, "That looks really good." He isn't one to dish out unasked for compliments on my crafty endeavors, so I was happy.

Price breakdown:
Wreath: $1 (regular price $10, 90% off after Christmas sale at JoAnn's last year)
Ornaments: $4 (4 packs of ornaments from the Target dollar spot)
TOTAL: $5--You can't beat that.

Now, a question for you, dear friends. Should I add ribbon? I could add a big bow at the top. Or I could wrap the ribbon around the wreath and have a bow at the top. If I do add ribbon, I think I would use a red, wide, wired ribbon. What do you think?????

Thursday, October 07, 2010

Jack-o-lantern Soap Dispenser

I saw this idea for a jack-o-lantern soap dispenser. I thought it was so cute; I just had to make one.


Luckily for me, I was going to Target today anyway, so I was able to pick up the soap dispenser. I already had some black Cricut vinyl on hand from a previous project. I just drew the face free-hand on the paper side of the vinyl and cut it out. I also had some orange and black ribbon in my stash. I keep pretty much all ribbon that comes through my house, which totally worked out for me today. See that cute candy corn ribbon? I had just the right amount.

I don't have a lot of decorations for fall, so this was a nice addition. I absolutely love it! I put it in the half bathroom downstairs. If you come over I'll probably force you to check it out.
Posted by Picasa

Tuesday, June 22, 2010

Chore Chart

I made a chore chart for Kaylin. Don't worry, her chores aren't much work. They're just things that we expect of her and I want her to get used to contributing and having responsibilities. The chores I want her to focus on are:

1. Get dressed
2. Do hair
3. Brush teeth
4. Make bed
5. Pick up toys

Obviously, I'm helping with most of these. Kaylin does well with positive reinforcement and loves charts, so I'm hoping this chart will help us get ready in the morning and keep her things picked up without too many tears and complaints.

First, I made a magnetic chart. I based it off of this tutorial.

I took two 5" x 8" metal shingles, which I purchased from Lowe's in the roofing section, and glued them with E6000 glue to a thin piece of cardboard cut to 8" x 10". I then printed the chart onto a piece of scrapbook paper and trimmed it to 8" x 10". I attached the paper to the metal shingles using some scrapbooking adhesive so that I can easily remove it and change the paper when I want. I then placed the magnetic chart into an 8" x 10" frame.

Here are her chore magnets:

To make the magnets I found clip art in Word and sized it to about 1" x 1". I made a text box over the top of each picture (make sure the transparency is set to 100%). I then basically followed this tutorial. I printed my magnet images on card stock. I've found that works better. I traced each pebble (found in the floral section of craft stores) around one image. I cut the image out and mod podged it to the pebble. After drying, I put a layer of mod podge on the back of the paper. After that was dry, I used E6000 glue to attach a ceramic 3/4" magnet.

Here is the finished chart:


Kaylin immediately wanted to move the magnets from the "to do" side to the "done" side. As you can see, we hadn't made her bed yet today. We then had to rush upstairs to make her bed. Now she is begging me to help her clean up the bonus room so she can move the last magnet. We'll see how long the excitement lasts. But even after the excitement has faded, I think the chart will be a great visual reminder of what is expected of her every day.
Posted by Picasa

Wednesday, May 12, 2010

Fashion Emergency

What would you do if you had a cute new outfit to wear and no matching hair bow?

Have your mommy make one, of course. (**Details on how I made the bow below.)

The shirt says, "I am berry sweet." I'd have to agree.

For lunch, we went to 5 Guys with Aunt Carly and Jack. Kaylin adores Jack, partly because he thinks she's hilarious. But what baby doesn't think a 3 year old is funny? Kaylin can get Lauren to laugh more than anyone else.


Yes. Kaylin is drinking ketchup. I love ketchup, but that is just a little too much. She had a nice ketchup mustache afterward.

**Korker bow details: After trying a couple of methods over the past few months (I used korker ribbon on the wand I made in December), the one I used today was the best. I simply wrapped 3/8" wide grograin ribbon, without overlapping, on a 1/4 inch dowel. I secured each end with a metal hair clip that I bent to make it stay on. You can use wooden clothes pins, but I don't have any. I also wrapped ribbon around the handle of two wooden spoons, but the handles are slightly larger than 1/4" so the loops aren't as tight. I placed the dowel and wooden spoons on a cookie sheet and baked them at 275 for 25 minutes.

After the ribbon cooled, I slipped it off the dowel. I cut the ribbon into 3" lengths. I heat sealed the end of each ribbon (held the end over a flame). For the bow pictured above I used 4 pieces of red ribbon and 3 pieces of white. I placed them in a row, alternating colors, and tied them together using a piece of elastic cording. I then hot glued the bow to a ribbon covered hair clip.

The clip was easy to make and I think it turned out really cute. I'll probably make more.
Posted by Picasa

Friday, March 12, 2010

"I Am a Child of God" frame

We're going to the baptism of a friend's daughter and after seeing this frame, I decided I wanted to make her a similar one. I think my version is cuter :-).


I bought an unfinished wooden frame at Michaels for 66 cents. (I used a 40% off JoAnn's coupon, did you know that they take JoAnn's coupons? I didn't until the lady in line in front of me used one and I just happened to have one in my bag. I only saved 40 cents, but still.)

I picked light pink and lavender because those are the colors of her bedroom.

Step 1. I painted the sides--both the outside edge and the picture opening.
Step 2. I placed my paper face down and traced the frame on the back of the paper. Then I cut out the pieces and decided where I wanted the seam between the colors to be and cut there. (I didn't cut out the entire frame for either piece, just about half of the frame.)
Step 3. I mod podged the paper onto the frame.
Step 4. I went to Laura's house and cut out "I Am a Child of God" using the Cricut Cuttin' Up Cartridge at 1 1/4". THANK YOU LAURA!!!!!!!
Step 5. I mod podged "I Am a Child of God" onto the frame.
Step 6. I gave the frame 2 coats of mod podge.
Step 7. I hot glued ribbon over the seam between the papers. I made a cute little bow too.

I added the picture of the cute girl getting baptized using the picture they sent on the invitation. It takes me FOREVER to put pictures in frames, so this way they can get it up right away if they want.

I am really happy with how it turned out and I hope she likes it too!
Posted by Picasa

Wednesday, February 10, 2010

Valentine Topiaries

I saw a heart wreath on The Idea Room and fell in love with it. Unfortunately, I couldn't figure out a place to hang it. It wouldn't be a good idea to put it on the front door since it's made of felt pinned into a foam wreath form. But then later she posted a topiary using the same method. I knew I had to make two.


Love them.

Little Birdie Secrets has now posted a tutorial for the love garland here.

For the topiaries I used 1/2 yard of dark red felt. I used 3" foam spheres and 3" circles of felt, just like the tutorial. I have no idea how many circles I cut out, but I used the entire 1/2 yard. The pails are from the dollar section at Target.

Posted by Picasa

Thursday, February 04, 2010

Little Birdie Secrets Blog Party

Tonight I went to Little Birdie Secrets' blog party. It was lots of fun. It was cool to see the faces behind the blog and their fabulous crafts.

Here is their amazing food table:


They had chocolate dipped licorice. I hadn't had it before, it was yummy. The cupcakes in the front had some sort of toasted marshmallow topping. Messy, but good.

Of course there was a craft. What kind of crafty blog party would it be without a craft?

Kim, Jessica, and Laura getting started.

Me, Laura, and Kim with our finished garlands.


I think the garland is a little small for my mantle. But oh well, I want it somewhere where I can see it all the time :-).

Thanks Birdies for a fun night! I hope you'll have another party soon!

I will post about those adorable topiaries later.
Posted by Picasa